
How a device “signs in”
There is no sign-in flow. When the device appears on the network:- Sign In matches the device’s MAC address against the Whitelist.
- If a matching entry exists and its Valid Until is still in the future, the device is admitted straight onto the network — no credentials, no portal render, no user action. It keeps access for exactly as long as that Valid Until remains in the future; when the date passes, the entry expires and the device is dropped.
- A device whose MAC isn’t on the whitelist — or whose entry has expired — isn’t admitted through this module. What the device sees then depends on the network integration: typically the Captive Portal, or an unchanged “no internet” state.
Adding a whitelist entry
The Whitelist module is always available on a Sign-In Context — there is no Activate / Disable toggle. Go to Sign In Modules → Whitelisting and add entries directly. Each entry has:- MAC address — required. Must be a valid MAC (
AA:BB:CC:DD:EE:FForAA-BB-CC-DD-EE-FF). Anything else is rejected. - Name — 2–100 characters, admin-only label.
- Description — up to 200 characters, admin-only.
- Tags — optional labels (e.g.
printer,floor-3,tenant-acme) applied separately from the batch upload, used for filtering later. - Length policy — how long the entry stays active:
- Forever — no expiry.
- Timeout — a number of days from creation.
- End date — a concrete date after which the entry expires.
Bulk upload
Use the batch upload for onboarding many devices at once. Each row in the upload carries MAC (required), Name, and Description. Tags are applied after the import from the UI.MAC address considerations
- MAC randomization — modern consumer devices (iPhone, Android, recent macOS and Windows) randomize their MAC per SSID. Whitelisting is not a good fit for personal devices for this reason — use Self-Provisioning by Email or other identity-based modules instead.
- Locally administered vs universally administered MACs — both work, but if you’re issuing MACs (for example from a DHCP reservation), keep a consistent format.
Self-Service Portal
Organization admins create whitelistings directly from Sign In Modules → Whitelisting and aren’t subject to any length or quantity limits. They can give a new entry any Valid Until date, or leave it to never expire. Everything below this line is about a different audience: end-users of the Self-Service Portal who get the right to whitelist their own devices — speakers, TVs, sensors, printers — through an Access Policy that has Whitelisting Permission enabled. Typical scenarios:- Residents in a co-living or student-housing Context adding their own media devices.
- Office staff registering the meeting-room speakers assigned to their floor.
- Classroom teachers adding the shared iPads used that term.
The Whitelisting Permission on an Access Policy
On the Access Policy’s Self-Service Permissions → Manage Whitelistings sub-tab, flip Enable Whitelisting Permission on and choose a Ticket Policy. The policy decides what Valid Until gets stamped on entries the user creates:| Ticket Policy | What happens when the user whitelists a device |
|---|---|
| Forever | No end date — the entry never expires on its own. |
| Timeout | The entry expires n days after creation. n is the policy’s Timeout for whitelisting field. |
| End date | Every entry gets the same fixed end date chosen on the policy. Useful for a single event, a school term, a project window. |
| Calendar | The user picks the end date in a calendar when they create the entry. Max whitelisting length (in days) caps how far ahead they can pick (0 means no limit). Default whitelisting length (in days) pre-fills the picker. |
- Max number of active Whitelistings — caps how many active
entries this user can have at once.
0means no limit. Hitting the cap blocks further creation until an older entry expires or is revoked.
What the Self-Service user sees
Users with this permission see My Devices in the Self-Service Portal — a combined list of the email-verified registrations the user owns plus the whitelistings they have created themselves. Filter pills at the top switch between Active, Expired, and All; expanding a row shows status, MAC address, last-seen timestamp, how it was verified, and — when known — the device’s operating system and browser.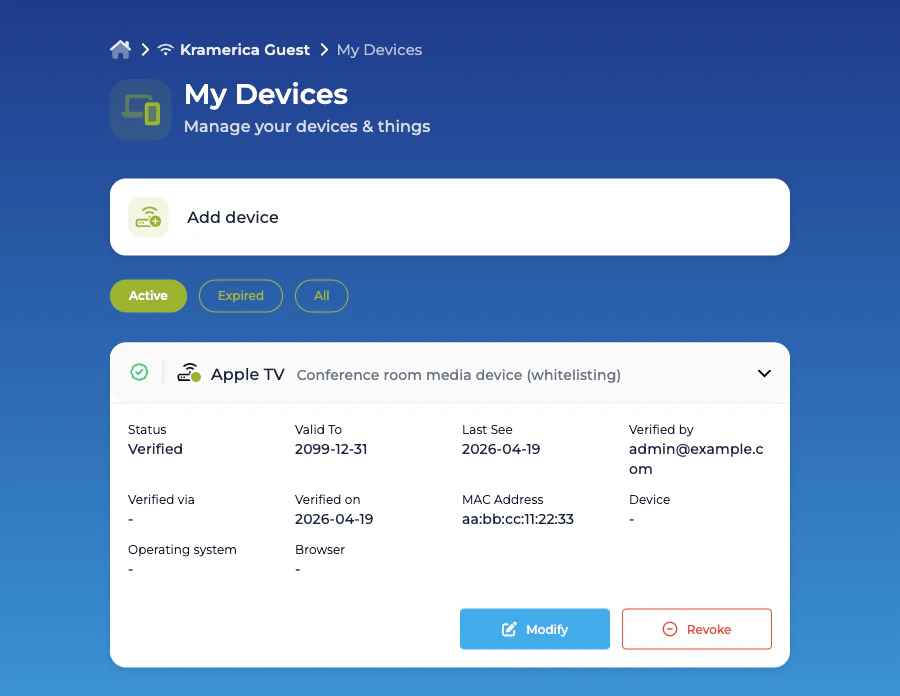
Adding a whitelisting
An Add device button opens the creation form: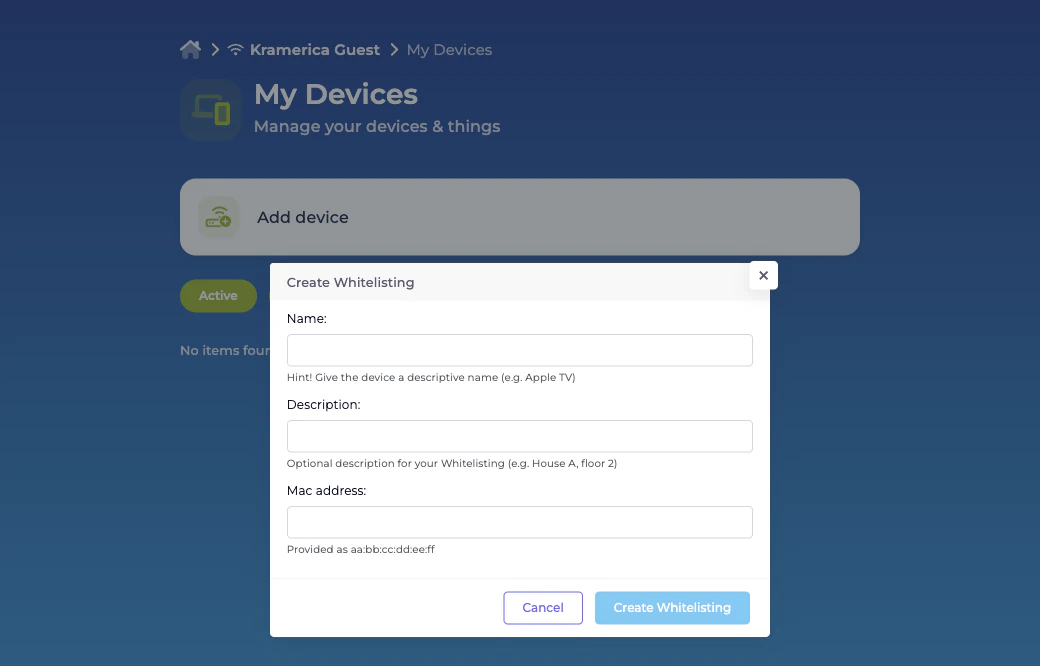
- Name — required; shown in the user’s list.
- Description — optional; useful for location or ownership context.
- MAC address — required, in
aa:bb:cc:dd:ee:ffformat. - Valid Until — shown only for Calendar Ticket Policies; the date picker is capped by Max whitelisting length (in days). Forever, Timeout, and End date policies stamp the end date from the policy itself without prompting the user.
Related
Self-Provisioning by Email
For personal devices that do have a user behind them.
Device blocking
The opposite of whitelisting — deny a specific MAC.